Tuesday, October 30, 2012

Salmon Pasta

Good Afternoon Bloggers,

So sorry to have stayed away so long, I missed my blog, but $@*! got real over here for the last two weeks, lots to do and very little time to cook (the only wrong with being busy).  I actually ate a lot of crap that I shouldn't have, but I think I've gotten a grip on things, hopefully it wont be another two weeks before my next post.  

This dish started out as a craving, as usual, but I had to find a sauce recipe that would do the trick, didn't want to experiment without a guide.  I ended up turning to what used to be one of my favorite placed to eat Bahama Breeze, I've blogged about it before.  I still enjoy the food there, but I've eaten there so much and tried almost the whole menu that I'm overly critical of everything that arrives on the table. 

At any rate, the last time we went Sissy had the salmon pasta which I never order, but I always have a bite of someone else's so I'm familiar with it.  I didn't have any that day, which was a huge mistake because I've been wanting it ever since.  

What I ended up doing to make this dish was going to BahamaBreeze.com and tweaking the recipe for their Brandy Cream Sauce.  They traditionally use this sauce for their Lobster and Shrimp Pasta, but I decided it would do the trick for salmon as well.  If any of you check out the recipe I omitted the lobster shells, but they would have made a world of difference in the flavor.  As a substitute you can always use seafood broth or clam juice to give a similar seafood flavoring to the sauce to help the brandy and strong herbs blend better.

Here is the original recipe (which I didn't follow to a "T"):
Brandy Cream Sauce
¼ cup of White Wine
4 threads of Saffron
1 tsp Basil, Dried
½ tsp Thyme, Dried
Shells from lobster (see pasta recipe)
1 cup Heavy Cream
½ cup of Chicken Broth
1 ¼ tsp Cornstarch
2 tsp Water, cool tap
2 Tbsp Brandy
Salt and White Pepper too taste
PREPARATION:
  1. Combine the cornstarch and cold water in a small cup and set aside.
  2. In a 1 quart sauce pan combine the wine, saffron, basil, thyme and lobster shells; bring to a boil and simmer until reduced by half. Add the chicken broth and heavy cream and return to a boil over medium heat.
  3. Slowly whisk in the cornstarch and water mixture then reduce the heat to low and simmer for 2-3 minutes. Adjust seasoning to taste with salt and white pepper.
  4. Remove from heat and stir in the brandy, then strain out the shells with a fine mesh strainer.
  5. Note: If you are peeling your own shrimp for this dish, increase the amount you purchase to 10 oz weight. Also, to create an even richer flavor you can add the shrimp shells in addition to the lobster shells in step 2 above.
This was my sauce during the thickening process, it helps to taste as you go, cream sauces can be tricky and you don't want to taste it at the end and be unhappy with the result.

Once my pasta and sauce were all ready everything went pretty quickly, Salmon doesn't take too long to cook, especially when its cut into little bite sized chunks.

I started by seasoning the Salmon, nothing too strong and powerful,  just some Adobo and Old Bay.


Next I heated some Olive Oil over medium heat, enough to coat the pan, fish sticks to the pan very easily and will begin to shred apart when that happens so be generous.

If you put too much, you can always drain the pan of excess oil before adding other ingredients.  Each side only needs about 90 seconds, unless you want to kill the fish twice, then feel free to leave it in longer : ).

Once the fish is cooked on both sides add the sauce and pasta to the pan, remember the pan is still on the heat and the fish will continue to cook even if you turn the pot off, its called carry-over cooking time.
When you don't consider that extra time your likely to end up with overcooked food, FYI.

At this point your pretty much done, this is your opportunity to take one final taste and decide if you want to add anything to dish like more salt, pepper, or any veggie/condiment that doesn't require much cooking.  I think tomatoes and scallions are popular additions.  Just toss everything together and Voila...

I decided to add some crushed red pepper to my bowl, in case I didn't want that extra heat in my leftovers.

These types of pasta dishes tend to taste better a couple hours later or even the next day sometimes, when all the flavors are settled. I hope you all enjoyed my version of one of Sissy's faves.

Until Next Time ; )


Thursday, October 18, 2012

Beignets

Greetings All:

I'm supposed to be on a fruit and veggie cleanse but for some reason this week I've been hearing a lot of New Orleans talk.  First it was announced that Beyonce would be performing at the Super Bowl in New Orleans (maybe Frank Ocean will make a cameo), then I was watching reality TV as usual and my favorite TV twins were visiting N.O. and eating Beignets which I've always wanted to try.  Beignets are a French fritter that can be either sweet or savory, but in Louisianna they've become a popular dessert.

I've never been to New Orleans, but I remember seeing the mix in World Market (which I never bought) and wanting to try them.  So there goes my cleanse.  Just my luck I picked the worst possible recipe to try, it was the only one that I had all the ingredients for.  Next time I'll go for one of the recipes with condensed milk, that seems to be a key ingredient missing in the ones I made.  

I won't bother giving the recipe, but when I have a successful batch I'll be sure to share.

These weren't bad, but they tasted like basic fried dough with powdered sugar on them, like we used to make with pizza dough at the OG, I think true Beignets have more to offer.  


Serves me right for trying to stray from the system for deep-fried sweetness.

I should have just stuck to the plan!! HA!! (lesson learned)

Monday, October 15, 2012

Mediterranean Ravioli

Good night readers, hope you all had a Happy Monday!

After last weeks Broccoli Potstickers I have a ton of wonton wrappers to use or freeze so I decided to try a new ravioli.

Initially I was going for a flavor that went well with a Marinara sauce, but after putting together the filling and tasting it I concluded that the filling had such a strong herb flavor that a simple Rosemary butter would suffice.  I literally melted butter, added rosemary seasoning and tossed the cooked raviolis in it. 

For the filling I used Broccoli, Feta Cheese, Oregano, Italian Herb blend, Garlic and Crushed Red Pepper

I also added 1 egg white to keep it together, not sure that was necessary but a lot of recipes call for eggs in the filling, and it didn't change the flavor or consistency.

Making Ravioli is pretty basic, and the process is the same no matter what the filling, Fill, fold, moisten edges, and close.

Usually Mediterranean dishes make me think of black olives, tomatoes and marinated peppers, but I neither had those items or care for them so I skipped them.  The sharpness of the feta and the rosemary butter made the perfect combination.  I'm about to eat some left overs with a Greek salad and pita bread.


That Parmesan cheese in the middle is really unnecessary but I needed to put something in the middle of the plate : /


Enjoy!!

Saturday, October 13, 2012

Tangy Jicama Salad

So I'm heading out to a get together at my lovely friend Erica's house and I really couldn't decide this morning what I should take as a side dish so I started looking up slaw recipes and decided to just create this one.  

Surprisingly I actually kept track of what I put in so hopefully you'll enjoy it, I'm quite impressed with myself. 

I've never used Jicama before so I wasn't sure what flavors went well with it, but its actually pretty versatile.  

You'll see I decided on:
1 bag shredded Carrots 1/2 a head of Red Cabbage
1/2 Red Onions 
1 Jicama
4 Scallions and 
1/2 a head of Green Cabbage

I chose to julienne everything as best as I could because grating gets everything so fine and mushy.  
I was in a rush, same rush I'm in as I type this, or I would have used my mandeline.

Once everything was cut I tossed everything together and set it aside to make the dressing.

The dressing is a combination of three different slaw recipes I've used in the past, and the cooking method of one in particular I use from Emeril Lagasse.

To start: Boil 1 cup of white vinegar with 1 1/3 cup sugar stirring to mix

Once it boils, take it off the heat and set aside to cool.  I refrigerated it to speed it up.

While that cooled down I decided what herbs to use (all dry)

Feel free to experiment with this part of the recipe because I didn't measure spices.
I started to, then I kept doubling back to add more so... sorry

I decided to use:

Oregano
Thyme
Celery Seed
Celery Flakes (i don't like fresh celery enough to buy a whole bunch)
Ground Mustard
Onion Powder
Garlic Powder
Paprika, and 
Cayenne Powder


Once the vinegar mixture was slightly cooler I added about a 1/3 cup olive oil mayonnaise and two tablespoons lime juice and whisked it all together.

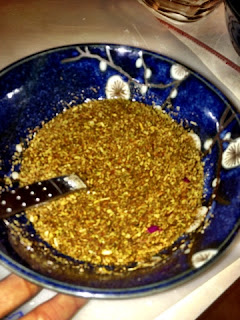
I then added it all to the herb blend which is what you see above...

The dressing is very light in texture, but rich in flavor, hardly noticeable in the picture below


I poured the dressing over the veggies, tossed and refrigerated.  Almost forgot, you can add salt and pepper to taste.

  Most of these types of recipes suggest that you make hours in advance or even overnight for enhanced flavor, but as I said earlier... In a rush, no time LOL


Thanks for reading, I'm late! (shocking)

Drunken Tiramisu

After working in an "Italian" Restaurant for almost ten years I had a skewed impression of what Tiramisu should taste like.  I enjoy the one served there from time to time, but after learning how to make it myself my variations are my favorite.  This is kind of like lasagna to me, now that I know how I like it to taste its hard to go anywhere and order it and actually like it.  
I'd never thought about making it at all until a coworker/friend Dudley was raving about the recipe he'd found and how good it was.  His recommendation should have come with a small Tupperware of leftovers for me to taste, however, he did eventually point me in the direction of the recipe at http://www.italian-dessert-recipes.com so I could try it myself.  

If you're considering trying this, it may seem intimidating, but its really quick and simple.  I've never actually followed the recipe exactly but over time I've been able to modify it to make it my own.  The website does provide a great base, but you'll see my suggestions below.

What you'll need is:

4 egg yolks
3/4 cup sugar
1 cup of marscapone cheese
1/8 teaspoon almond extract (any flavor you like will work)
1 1/2 cups heavy whipping cream (you can use cool whip, i don't recommend it)
1 package(7 oz.) of lady finger cookies
1/4 cup Kahlua or coffee flavored liquor
1/4 cup dark rum (a teaspoon of rum flavoring can be substituted)
1/2 cup espresso or strong coffee
unsweetened cocoa powder

Step 1: Mix egg yolks and sugar together, stirring constantly over a double boiler.
I've never owned a double boiler,a bowl that can handle heat sitting over a pot of boiling water will suffice.

Once mixed, continue to stir over lowered heat for about 5-10 minutes until the color lightens and the mixture is creamy.


Remove bowl from heat and and continue stirring to cool and stop the eggs from cooking further.

Add flavoring of your choice and set aside.


At this point you whisk the heavy cream rapidly until it thickens and looks like the whipped cream you're used to.

It's recommended for this step to put the bowl in the freezer to help the heavy cream stay cold as you whip,
this really isn't as hard as it seems, you just have to be patient, for this amount it takes between five and ten minutes to get stiff peaks to form when you pull the whisk out.


Start to fold the whipped cream into the egg mixture gently to keep from losing the creamy texture of the whipped cream.

It will be lumpy at first, but continue to fold slowly until they are both completely combined.


This is what it should look like when you're finished combining the two.

Try really hard not to taste it because you'll get hooked, and maybe decide you don't need to make the actual tiramisu because the custard is good enough LOL


Its better to use a clear dish if you have one for the visual appeal.
This is actually a gift for Dudley so its in a Tupperware but I usually use a Pyrex dish.

Line the lady fingers up along the bottom of the dish and prepare to layer everything together.


I'm not really strict on the liquid measurements because sometimes I end up adding more as I go along, I also use instant coffee because I don't drink/brew coffee at home.

The original recipe says you should brush the liquid on, but after trying I decided that its better to just roll the lady fingers in the bowl to get it really covered and soaking through.

The substitutions for the liquid are endless, I've used Frangelico, Amaretto, and Bailey, just keep in mind that the custard is already sweet so if you use a sweet liqueur you may want to decrease the sugar in the custard.


Don't worry about it being too soggy  once you start layering you can't get any more coffee down there and you won't be happy if you bite into your tiramisu and its dry yuck!

Next you add a layer of the custard, this is a side view of what it should look like.

I usually shake the container to get the custard to settle in around the lady fingers.  
At this point you could also add a layer of cocoa powder of shaved chocolate.  I never do but I've had it made that way a few times.


Continue to layer with the soaked lady fingers until you're at the top of your dish.
Be sure to leave room for the cocoa and try not to get the custard right to the top in case you need to cover it with saran, you don't want all the custard sticking to the top.


This is the unsweetened cocoa powder I use, I have also used sweetened powder but only if I decrease the sugar in the custard mix.


Finished side view


Bon Appetit!

Friday, October 12, 2012

Tangy Steak Marinade

In the spirit of shopping a good sale I picked up Top Sirloin from my favorite grocery store and couldn't figure out what to do with it.  I started browsing the internet looking for popular steak marinades.  There are a few store bought ones that I like but they tend to be full of sodium and end up spoiling in my fridge because I don't finish them quick enough.

After skimming about a dozen recipes I decided to go forward with this one.  I made the Worcestershire Sauce the predominant ingredient since it has the most unique flavor and I really rarely use it.  

sidebar: I doubt the Foodtown I bought this from is even still open, luckily there's no expiration date HA!!

So I literally threw a little bit of everything into a Ziploc bag then tasted it, I also threw some sugar in which didn't make it sweet but helped balance out the balsamic taste.

I left it marinating in the fridge over night, a couple hours work as well. I also flipped the Ziploc over at some point to make sure both sides were marinated.

I know everyone doesn't enjoy their steak as medium as I do, but I can no longer stomach a well done steak, this came out perfect to me, pink in the middle and not dripping blood.  I don't like rare either, when its not even hot in the middle, yuck!

I broiled it by the way.

yummer!!

Thursday, October 11, 2012

Clap Roti

Ok, it's not really called Clap Roti, that's a nick name like Buss Up Shut!  I never questioned the meaning of the nick name but it eventually became obvious to me, perhaps when I got a deeper understanding of the Trinidadian accent LOL.


Story behind Clap Roti is the immediate abuse you put on the roti the minute it comes off the Tawah (popular round griddle), or out of the frying pan.  Buss Up Shut is in reference to what the roti looks like when it reached your plate, a shredded t-shirt..., or a busted up shirt.  If you don't have the proper Trini genes or affiliation you may not be able to put the right sing-song stank on the buss up shut to get it to sound quite right, so for you we'll call this clap roti.

Although most of the roti I've experienced has been from Trinidadian restaurants and Guyanese relatives around Brooklyn I actually got this recipe from my What's Cooking in Guyana cookbook.

I was challenged to try to make Dahlpuri (the one with the peas), but I figured I should crawl before i walk and this is much less complicated.  

Disclaimer: This recipe does NOT offer measurements for most ingredients so you kinda have to feel your way around the dough.  Also, The recipe suggests using Ghee which I wasn't motivated to make so I settled for the other option good old Butter or Margarine, but next time I will use Crisco for a lighter texture.

I started with 4 oz. of all purpose flour and 2 oz. of butter, cut the two together until mealy

Then I added just enough water to get it to stick together but not sticky.

At this point the dough sat uncovered for 10 minutes.

The recipe got tricky to me at this point, probably because I was getting hungry and impatient so I'll just tell you how I improvised.

After the 10 minutes I cut the dough into four sections,
On a floured surface I rolled each piece out and evenly brushed it with vegetable oil and sprinkled with flour,
Once all pieces were rolled out I folded each piece twice like a piece of cloth.


After another 10 minutes I rounded each piece out and prepared to roll it out for frying.

Heat and grease (more veg. oil) a large pan or Tawah if you have one,

I didn't stay true to the round shape of the roti, rolling out true circles is not my forte, but the flavor was all there lol

Each piece gets rolled out as thin as possible and placed over the greased pan for literally a minute at medium heat.  The first two I let cook too long and they got a little crispy, so I had to watch closely for signs of being cooked, kind of like with pancakes.

Once the first side is cooked flip it over and brush the cooked side with oil and standby for a few seconds while the second side cooks.


Once you're ready to remove it from the pan have a clean towel or two paper towels ready to "clap" the roti 


Really mush it together, it should end up really wrinkly like hot laundry left in the laundry basket, that's why it doesn't really need to be round, no one will ever know, HA!!

Part of why I overcooked the first two rotis was because I was getting my Curry Potato started.  Usually this curry has chana or chickpeas to accompany the potatoes but I'm not a fan, and we all know I love my potatoes, they're all I need.

Also you'll notice I let the gravy get really thick, which is how I like it unless its Curry Chicken  then I like a watery gravy the way Gramps used to make.

...& Voila!!

If you don't have a reference for this dish you might be happy with your first attempt, but I know mine will be better with practice.  Good luck if you're feeling brave enough to try!

Thanks for Reading!!

Broccoli Potstickers

I recently realized that my cravings aren't all about the foods themselves but about the fun I have eating them.  Potstickers are both fun to make and fun to eat, especially if I have chopsticks (which I didn't).  I also realized that with certain foods I care more about the flavor than whether its chicken or shrimp or vegetarian.  I originally made these Potstickers with Chicken and Broccoli (triangles) then decided to make plain broccoli ones (rectangles).  


I surprisingly loved the plain broccoli ones better, they held the sauce I made better and protein really changed the flavor and texture a lot. I started these by making a broccoli recipe I've been using for over ten years, it really simple and tasty.  The recipe is primarily ginger and soy but today I omitted the soy in case I wanted to use soy sauce as a dipping sauce after they cooked, didn't want it to be too salty.

So I started by sauteing garlic and ginger in sesame oil, 

after a couple minutes I added some sugar, Chinese five spice and crushed red pepper to make a paste over low/medium heat...

I then added some hoisin sauce, oyster sauce and chopped broccoli.  Although I chopped it before cooking it I still needed to chop it again after, the larger pieces of the stem were tearing through the wonton wrappers.


Whenever using wonton wrappers I try to work quickly and use only a few at a time because the air exposure hardens them.

You'll have to test out a few to figure how much filling is enough, also the rectangle shape is harder to keep closed that the triangle, so you may need to improvise.  Truth is potstickers should be made with the round wrappers, but I already bought squares and didn't want to be wasteful and cut circle out.


It's better to moisten the edges with water before filling, but they dry too quickly so I do it after filling, then close and cook, the sooner the better.  

If I'm doing a lot at once I close them up and put them in an airtight container in the fridge as I go along until I'm ready to cook them.  These tips are good for pretty much anything you do with these wrappers.


Here comes the challenging part, for me at least.  Most of the directions I found involved a two step cooking process, which I modified (you can tell by my finished product).

So first you heat enough canola/veg oil to fill the bottom of a frying pan.

Brown the potstickers in the oil, time depends on how hot your pan is, when its the color you want you're supposed to add water to the pan and cover for a few minutes.

Then you flip them in the water and let the opposite side cook for the same amount of time. 

The problems I had were that the water naturally made the oil splash all over the place so I had to decrease the amount of oil drastically for the second batch, and potstickers are actually sticky, so once they start cooking they need to be kept apart (especially when you plate them).

Also, I utilized the pan's cover to put the water in to (1) make the covering process quicker and (2) avoid getting burned. (scared-y cat trick)

By the last batch I real wasn't paying much attention because they smelled so good that I was already eating (just the ones that ripped open) LOL

Yummy Broccoli filling, I'm making these again for sure, maybe with carrots and spinach.  I ate these all day, until they were just a memory, now I'm hungry again, #greedygirlproblems

Thanks for Reading!!

Wednesday, October 10, 2012

Aji Verde Sauce

Sooo, I'm not sure how popular Peruvian food is around the US, but in New York there are a ton of options.  Where I live now the closest Peruvian restaurant is almost 45 minutes away which doesn't help me at all.  This sauce in particular is an attempt at a sauce Kerry got me hoked on from Pio Pio, they also have a version of it at one of my favorite Brooklyn hideaways Luz.

For years we haven't been able to figure out how to make the sauce ourselves, so we've been buying it in batches, even smuggling it home on a plane once LOL.  So although this isn't identical, it definitely came close, a little trial and error could perfect it.  If you've ever had this sauce or try to make it from this recipe you should know it should be a lot more smooth, but my blender is MIA so I had to use a food chopper.  It should turn out that light green color with no chunks.

I found the recipe I used on sundaynitedinner.com accompanying a recipe for Peruvian Roast Chicken which I've tried before.  The Roast Chicken recipe was tasty, but I haven't mastered making a whole chicken the way I like, so I opted for store bought in hopes to really enjoy the sauce.  The only thing missing from my plate was sweet plantain, but I was too hungry to wait.  The flavor of the Aji Verde is spicy but fresh, probably because of the fact that you don't have to cook it at all, plus it requires a lot of Cilantro.

I've never had this mix on anything other than chicken, but I have some left, and will be putting it on any and everything until I'm sick of it.  There's actually a Peruvian potato dish I used to get at potlucks at my old church, maybe I'll hunt that recipe down and see how it all goes together. 

If you want to give it a try I used:

3/4 cup chopped fresh cilantro
1/3 cup cotija cheese (found this at Walmart surprisingly)
1/3 cup E.V.O.O.
1/3 cup water
2 to 3 Jalapenos, stemmed, seeded and diced (keep the seeds for extra heat)
1 clove garlic chopped
1/2 teaspoon red wine vinegar
1/2 teaspoon kosher salt

Enjoy!

Tuesday, October 2, 2012

Jollof Rice

Ok lovely thatsmydish readers, I'm not abandoning my Caribbean roots at all, still have a deep rooted love for the Pelau and the Cook-up rice, but last night on Instagram I was inspired to go West African with my rice.
The rapper Wale posted a picture of a rice dish that all his followers were raving over. It reminded me of a few days ago when Melanie Fiona posted a picture of her mom's Bake and Salt fish she was enjoying in Toronto and how that picture almost had me tasting the food LOL.

So in search if the same familiarity Wale's West African Instagram followers had I decided that Jallof or Jollof rice would be my next experiment.
sidebar - isn't that a sexy sight? ;)

So about the rice, apparently its a traditional dish in most of West Africa.  It's usual components include tomatoes, onions, broth and a variety of spices that can be any variety of ginger, curry, cumin, cayenne, chili, and nutmeg.

I didn't have a recipe, just took a shot in the dark with the research I did.  If you follow my lead you should know that I'm impatient with my rice and keep opening the pot to see how the flavor is.

I started by sauteing onions in olive oil

then added cumin, cayenne and ginger

once onions were cooked (on low) I added tomato paste

I used 1 cup of Jasmine rice, making sure the rice was coated with the tomato mixture

I then added chicken broth and brought it all to a boil

I added a bay leaf, salt and white pepper to taste, then covered and lowered to low/medium for 25 minutes.

It took me longer because I wouldn't leave it alone, so I ended up adding more stock and lowering the temp.

another sidebar - does your supermarket sell crab legs already shelled like this, just amazing!

Like any other traditional dish there are numerous variations, I will definitely add shrimp or chicken next time and some type of peas or beans.  This is the type of rice with such a good flavor it can be a one pot meal.  I'm actually eating my left overs with fried plantain and salad, no meat.

I'll definitely look out for what Wale's cooking next, and maybe I'll check out some other popular African dishes.  The aroma of this rice was so good, Full, Nap time.

Hope you enjoyed, Love U for reading!!